Putting Credit Monitoring to the Test

13 07 2020

Ever wonder if credit monitoring services actually work? This weekend I applied for a new credit card and after being approved waited to see which credit monitoring service I had signed up for would actually inform me of the activity.

Within 60 seconds my phone lit up with notifications and texts and emails. I checked my phone, it was Credit Karma informing me a hard credit enquiry had been made in my name by CitiBank. Wow that was quick! Credit Karma is free to use, the speed of notification was amazing given its price.

One hour later my phone jumped into life again and this time it was Discover letting me know that a credit enquiry had been made in my name by CitiBank. I am a Discover Card holder and did sign up for their free credit monitoring service. They offered to provide verbal advise on next steps if this was a fraud in progress and provided a number to call. The discover credit monitoring service is free to all comers, you do not need to be a Discover Card holder.

The following day (a Monday) my phone jumped into life again and this time it was Lifelock, a identity protection service I subscribe to annually for $247.42 (plus applicable taxes). Lifelock have you access your dashboard and confirm if the activity is you or not. This is one difference to the free services, LifeLock want to know if the activity is legitimate, a step beyond informing you of the activity.

I find it interesting the paid for service took the longest, and the two free services were very quick. Regardless, notification within 24 hours is plenty quick to help protect your money and identity.

So why do I pay for a service if other services are equally good, or arguably faster than Lifelock? The free services inform you of activity and have useful help pages on what to do if someone tried to steal your identity. The onus is on you to navigate through an untraveled and uncertain path to restoration, recovering lost money is uncertain as well. Lifelock will take necessary actions to address any identity concerns and cover any financial losses up to One Million dollars as long as you do your part to keep them informed and be cooperative in the process.

In the final analysis all three services came through to ensure I know of any activity on my credit report. They all passed the test in my opinion.


Amazon Calling coming to Fire Tablets “Soon”.

13 05 2017

I was pleased to learn that the new Alexa app on our iPhone and Android phones is capable of making and receiving Amazon Echo Calls and Messages.

I updated all the apps on my 5th Gen Fire Tablet but the Alexa app is still the old app with old icon and menu structures and no ability to use Amazon calling functions.

After a fruitless search online I found no information on Amazon’s website or any news sites about support for Amazon Calling on Fire Tablets. I started a support chat session for my Fire Tablet and soon learned that the Alexa app on Fire devices will support Amazon Calling “Soon”. Amazon aren’t providing specific dates, but indicated its a priority for them.

I also asked about the website http://alexa.amazon.com and if it would support Amazon Calling. The support rep was a little more cagey and did not indicate that such functionality is being developed. The rep did say however that Amazon’s ultimate goal is to have Amazon Calling on any and every device.

You can read the transcript between myself and Amazon tech support here.

Part of my motivation to find out about this is that I hoped I could turn my Fire Tablet into a ‘poor mans’ Amazon View at no extra cost; just put it on a stand and make or receive calls. It sounds like they will certainly support audio on Fire Tablets. I’m not sure they will go as far as video calls on a Fire device as this will undermine View sales. However how cool would it be if you could make a video call using a Fire Tablet or even better your TV using Fire TV?


Amazon quietly unleashes a sleeping giant – Alexa – to a TV near you

5 03 2016
Fire TV Stick now comes with Alexa

Fire TV Stick now comes with Alexa

What this isn’t

This post isn’t about Amazon Echo, a device that has received rave reviews from most of its owners.

It isn’t about the newly announced Echo Dot or the Echo Tap devices that extend the Alexa experience around your home.

As great as those devices are, they won’t extend Alexa into a household unless someone buys a new (relatively expensive) tech gadget.

What this post *is* about.

Amazon have started giving Alexa away for free!!

Alexa is a very powerful cloud platform, not a cute name associated with an expensive gadget for upwardly mobile techies.  You maybe able to use Alexa on a device you already own – a Fire TV or Fire TV Stick for nothing. The latest software update to Fire TV and Free TV Stick has Alexa technology built in. You may already have Alexa attached to your TV which is ready to respond to your commands, you just didn’t know it.

You can be excused for not knowing about this. While the Amazon Echo Dot and Tap have been getting all the press lately, on the Verge and Lifehacker, articles announcing Alexa as “coming” on Fire TV devices have gone largely unnoticed.

The Amazon Echo is quite expensive at $179, the Tap at $129. Alexa on your Fire TV comes in at $0. Free. Nada. So now instead of looking at Alexa as a device (Echo, Dot or Tab) we now see it for what it is,  an all encompassing cloud platform. This is just the start of something huge Amazon are building.

Fire TV Set Top Box

Fire TV Set Top Box

Using Alexa on your Fire TV or Fire TV Stick device.

Your Fire TV device needs the latest Fire TV software version, version 5.0.5. You probably already have it, if not, it’s easy enough to request an update.

Next download the Fire TV App on your Android or iOS phone. Turn on your TV and Fire TV device, launch the app and sync to your Fire TV device. That’s it you’re ready.

You’ll notice a microphone icon at the top of the app interface, drag it down and *hold* it down. It works like a walkie talkie, you have to hold the microphone button while you talk. Speak your command like, “add sausages to my shopping list”. Alexa verbally responds on your TV speakers “Sausages added to your shopping list” and there is your shopping list displayed on your TV. Echo can’t do that, it hasn’t got a 56″ HD display to work with.

Try something else like “Play Adele”, and Adele plays on your TV. Say “Downton Abbey” and your Fire Tv device shows a tile for the TV show. Much quicker than searching with the remote text input on fire TV.

Screenshot 2016-03-05 at 12.27.33

Sometimes Alexa is dumb.

Some commands fail, either Alexa didn’t understand what you said, or doesn’t know how to respond. For example instead of understanding the word “Democrat” she may hear “Dimmock Rat”. Current affairs typically trip her up. So how do you figure out what she heard?

Next you need to download the Alexa app to your smart phone. Once installed you can look at the history of voice commands and in plain text is what Alexa heard you say. You ca also play back the audio of your command. A little bit creepy to think Amazon stores your voice commands indefinitely, but at least you can see and hear what they have recorded. Transparency helps with the creepy factor.

The Alexa app also shows you your shopping list, useful at the store so you don’t forget the sausages you wanted.

Alexa also has a to do list you can mange verbally. If you already have a calendar and don’t want another ‘to do list’, then you can attach your Google Calendar to Alexa instead and then have Alexa read you calendar to you audibly by saying “What’s my schedule?”.

Alexa can also play your current Audible book to your TV, just say “Play my Audible Book” and it starts and aslo shows the books cover art. It is fully whisper sync compatible and synchronizes with your other audible playing devices. If found it important to say “Stop playing my book” to be sure it recorded my place in the book.

Managing links to other services such as Uber or Dominoes pizza is best done on your compuer via Amazons Alexa website alexa.amaxon.com

If you like it, add the voice remote for Fire TV for $29.

You can add a voice remote

You can add a voice remote

Using the free Fire TV smart phone app is great, but navigation isn’t as easy as with a physical remote. Its easy to trigger a TV show accidentally while scrolling through a list of episodes. The Voice Remote can be purchased from Amazon for $29. I have the original Fire TV Stick, the new 5.0.5 software has made the device a little less responsive than it was, Amazon maybe stretching its capabilities to the max, you may instead decide to upgrade to the new version of the stick that comes with the voice remote or get the full featured Fire TV.

The fire TV Stick can’t do all features of Alexa. Home automations such as switching on lights, changing thermostat temperature aren’t available. You can’t train ALexa to understand your dialect better. For those functions you need the full Fire TV set top box device or one of the Echo products.

Alexa on your TV – not just a me too upgrade.

Alexa's response to my question about Mt Everest

Alexa’s response to my question about Mt Everest

Actually seeing your full shopping list visually, seeing the album art for that music adds to the experience of Alexa. If you do a search for Mt Everest it shows you a picture of the mountain on the TV as well as tell you the basic facts. That’s neat. This isn’t just a me too experience. Amazon are smart, they realize giving Alexa away for free will drive sales of Alexa compatible devices as you get to use the service more and more.

Some may not want to sink $180 into a fancy speaker system you can talk to and listen to music on. Alexa on a Fire TV ($100) or Fire TV Stick ($50) is much cheaper and does much more as a true set top box device with video and the ability to run applications such as YouTube and NetFlix. Alexa on your TV It isn’t always listening, so may allay privacy fears from people who are concerned with Amazon listening in.


Live Streaming on a Budget

28 02 2016
Canon Camcorder on permanent mount

Canon Camcorder on permanent mount – click to enlarge See video below to see how the camcorder zooms.

Challenged with finding an inexpensive way to stream a church service to the internet with a shoe-string budget, I have arrived at a setup I believe is worth sharing that costs about $500 (if you use a existing desktop computer). Here is a video we streamed to YouTube recently…

The upfront cost to do this (assuming you already have a computer) is about $500. Monthly expenses are less than $10/month.

We realized that gamers are constantly streaming/recording their games to YouTube or other streaming sites and we’d do well to utilize the systems gamers use on a low budget. However gamers don’t need to record activity at a distance, its normally confined to a single room in a home, so we needed to find the right video capture device.

We did go through a variety of configurations and learned some valuable lessons.

Our final configuration

Here is the equipment and software we settled on

The Canon Vixia 600 camcorder was cheap since its a discontinued model, the current 700 series model will set you back $300.

Details of how we set it up

Camcorder and mount.

We chose to mount the camcorder on a fixed mount onto a wall in the media booth. Using a tripod on top of our work surface in the booth took up valuable space and the video image vibrated as media personnel went about their duties on the work surface. The Camcorder came with a HDMI cable to attach to the computers capture card. Since we are streaming only, no memory card is needed for the camcorder!

The Vixia camcorder can be configured to remember the last zoom position and can be left attached to a power source and the media computer at all times. It’s truly ‘set it and forget it’ once you have tweaked things the way you like it.

It was necessary to turn the microphone volume down to zero on the camcorder to avoid a hiss or any feedback.

The only thing media personnel need training on is where the on/off switch is for the camcorder.

Avermedia Capture Card.

The Avermedia capture card is installed into a PCI-Express Slot. It is a ‘1x’ PCI Express card so should fit any PCI-Express slot not just the smaller 1x slots. The card came with a nice array of cables, none of which we needed and comes with a 3 month subscription to XSplit, our chosen software for streaming to YouTube. For some reason the card comes without a driver CD and the card isn’t recognized by Windows. You’ll need to download the latest software and driver package from the Avermedia website. It was a painless install.

XSplit Broadcaster.

XSplit is free to try. Installation is easy enough.

Add the camcorder as a “source” for video and you are set for video capture.

XSplit can be configured to always source audio from the ‘microphone in’ on the computer – we have a cable that runs from the headphone jack on the soundboard to the computer microphone in. We record audio separately using Audacity for some projects when video isn’t needed, so we prefer not to connect the audio to the camera or video capture card directly.

YouTube Live

Resist the temptation to use a personal YouTube account and establish an account linked to the organizations main email address. Once established Live Streaming is activated by visiting “My Channel” and then “Video Manager”. Live streaming is an available option in Video Manager. Follow the “Live Stream Checklist” which guides you in the steps necessary to create a live stream feed on the YouTube account.

Under “Stream Options” there is a section for Encoder Setup. Copy the URL and paste it into XSplit to link XSplit to YouTube account. The option in XSplit is under the “Broadcast” menu.

We enable the DVR option under Stream options, which creates a permanent recording of all live streams.

At this point you should be setup to test the stream.

YouTube have a rudimentary editor that allows videos to be trimmed. As a rule we stream/record only the sermon. Music and videos will attract attention from copyright holders. Copyright violations could result in the account being terminated. Most often the rights holder allows the copyrighted content to be posted on YouTube and YouTube sells advertising space on top of your video. This will not happen if no copyrighted material is posted on YouTube.

The YouTube video editor is hard to use and is very basic. We encourage media personnel to start and stop the stream so that only the sermon is streamed and recorded therby eliminating the need to do any editing at all.

Our next steps – Multiple camcorders and mixing video

Our next step will be to install multiple cameras and capture cards so that we can switch between a close up or wide views. Currently the streaming is done on our main media computer. This is the cheapest option and makes things tricky for the media team.

Handling multiple cameras will require us to buy a dedicated computer for video. That will have to wait for funds to be available. XSplit has the ability to manage up to 16  video feeds, so video switching/mixing can be done all in one interface. It saves the need for a dedicated video switch hardware and allows multiple video feeds to be merged or overlay-ed.


Upgrading Intel Compute Stick to Windows 10

29 11 2015
Screenshot 2015-11-29 at 18.01.18

Intel Compute Stick

If you buy an Intel Compute Stick that comes with Windows 8.1 you may get prompted to upgrade to Windows 10 as you setup the device. DON’T!

Intel Compute Sticks have some flaws that will prevent a successful upgrade to WIndows 10 and also prevent you from rolling back to Windows 8.1. You will find yourself with a bricked Compute Stick. The “recovery Partition” that comes with the device is also faulty.

There is a way to do the upgrade without problems, here are the steps.

If you made the mistake of upgrading and your compute stick is non functional, scroll to the end of this article for recovery instructions.

Step 1 – Upgrade to the Latest BIOS for your Compute Stick

Compute sticks with a BIOS version prior to release 24 will fail and create a catch 22 situation with your upgrade. To upgrade your BIOS follow instructions at Intel’s website here.

Screenshot 2015-11-29 at 16.36.54

Be sure to select the latest version

Step 2 – Download WIndows 10 Upgrade Instructions from Intel

Download a very helpful PDF from Intel’s website located here.

Step 3 – Obtain Windows 10 Home Edition from Microsoft

The instructions will guide you through downloading an ISO image for WIndows 10 Home 32-Bit. Do not use the 64-bit version of Windows 10. Use a USB drive of 16GB or larger capacity.

Before copying the ISO to a USB drive be sure to format the USB first using NTFS partition type first. The 6GB ISO image will not copy to a FAT32 USB drive. FAT32 has a 4GB file size limitation.

Step 4 – DON’T install Windows 10 yet as instructed!!

First do the post install step of downloading new drivers for WIndows 10 and place them on your USB drive. This is important as you may not be able to connect to the internet if the wireless adapter driver fails under Windows 10.

The latest drivers can be located at Intel’s Website here.

Copy the drivers for Wireless, Bluetooth and Graphics Adapter to your USB drive.

Step 5 – Upgrade to Windows 10 as instructed

Now its OK to upgrade using your USB drive per the Intel instructions. Be sure to follow the instructions by the letter. Key points are

Attached USB Drive and reboot the system.

Don’t download updates as prompted by the Windows Update Process.

When prompted to choose what to keep when upgrading, be sure to select keep personal files only, even if it’s a brand new unit with no personal files on it.

Step 6 – Install the drivers you downloaded earlier.

I found it useful to download and run the Intel Driver Upgrade Utility. It takes the guess work out of selecting the right driver and finds others you may have overlooked.

Step 7 – Check Windows 10 is activated.

Press the WIndows Key and the letter I at the same time. Choose Update and Security.

Choose the option ACtivation option on the left hand menu to check your Windows Activation Status. If you are activated you are done.

Step 8 (Optional) – Reclaim 2GB of Lost Disk Space due to Upgrade

Windows retains a complete copy of your old windows 8.1 installation should you wish to rollback for any reason. This rollback is available for 28 days after initial installation. The disk space lost to the old installation is significant on the small 32GB disk drive Compute Sticks come with.

Download CCleaner from Piriform here.

Look at the advanced options and check “old windows installation” then click on clean. The cleaning process takes 4-5 minutes.

After cleaning is complete disable monitoring on the options tab after installing the CCleaner product.

Did your Compute stick get stuck upgrading before you came here?

To release your compute stick from its Catch 22 dilemma follow instructions at this intel community forum. The poster provides a total recovery image that does what the recovery partition fails to do on the original Compute Stick. The Intel forum will re-direct you to a support site for Hannspree and instructions for using the image are found in this PDF document


Amazon PrimeNow – Nashville

28 11 2015
Screenshot 2015-11-28 at 10.28.59

Amazon PrimeNow

As of November 20th 2015 Amazon now offer their same day delivery service in the Nashville area. This service is available for Prime members only. There is a promotional checkout code GETITNOW that gives you $20 off your first order of $50 or more. That’s a pretty good incentive to try the service, so I did.

2 Hour Delivery Promise

My first impression of the service was that once I place an order with the PrimeNow service I’d get it delivered at my house within 2 hours (1 hour for an additional $7.99). That’s not quite how it works. Orders are delivered in a 2 hour delivery window, time is also added for picking and packing the items. So an order I placed at 8:04 am was available for delivery 10am-12pm the same day at the earliest. So worst case scenario is almost 4 hours from time of order. Still pretty amazing, but don’t think you can get that last minute item delivered in under 2 hours. It is possible to select later delivery windows when placing your order if the first window doesn’t suit you, so there is no need to wait until 3-4 hours before you want an item. There is a reasonable amount of flexibility.

Ordering and Selection on Mobile Devices only

To select and order items using PrimeNow, you must use a specific Amazon PrimeNow application which is for mobile devices only. It is not possible to order via a laptop or desktop computer. I found the experience on my smart phone to be rather limiting. A much better experience can be had on an Amazon Fire Tablet, the app there is much easier to use thanks to the larger screen. I did install the iOS app on my iPad, but the app is made for the iPhone only so is very limited on that device as well. For the best experience use an Amazon Fire Tablet. Amazon really should develop a native iPad app.

If you have a tricky place to find or need to provide the driver with special instructions, that can be done in the app during the checkout process.

Wide selection of items

The Nashville PrimeNow warehouse, located close to Nashville airport, carries a wide range of products. I hadn’t expected items such as Ice Cream and Eggs to be available. I had imagined more durable and non perishable goods. Even though they deliver grocery items, this is a different service to Amazon Fresh. Fresh isn’t available in Nashville, but PrimeNow is pretty close to it.

When you see bulky items such as 50″ TV’s or a smoker offered you realize that this is more than a convenience service. This service could impact Best Buy and other electronics outlets in the Nashville area. If your car isn’t big enough for a large TV, the Amazon delivery maybe quicker than the local stores delivery and you don’t have to change out of your PJ’s!!

Delivery is Free – Sort of

Amazon deliver within the 2 hour window for free. You can’t argue with free. However there is a delivery driver gratuity of 10% added to your order. Amazon promise that 100% of the gratuity goes to the driver. You can alter the tip amount up or down, a tip isn’t mandatory, you could reduce it to zero if you really wanted to.

The odd thing is that the tip is charged when you place the order, not at the time of delivery. Tips should be a reward for good service and the amount set as appropriate. It is possible you’d tip a driver well and he/she be late or rude. That wouldn’t be good. There should be an option to add a tip on your mobile device after the delivery is made.

Drivers are instructed to refuse tips in cash, so giving a cash tip isn’t possible.

Good prices

I purchased 5 items, they were at or below the prices on Amazons main website. One item was $15 cheaper via PrimeNow in two hours versus ordering online with 2 day shipping. The online item that was more expensive was sold through a merchant, not Amazon directly, which explains the price variance.

Before ordering online check the prices of items on PrimeNow, the savings may more than cover the cost of a tip for the driver!!

Uber like tracking of Delivery vehicle.
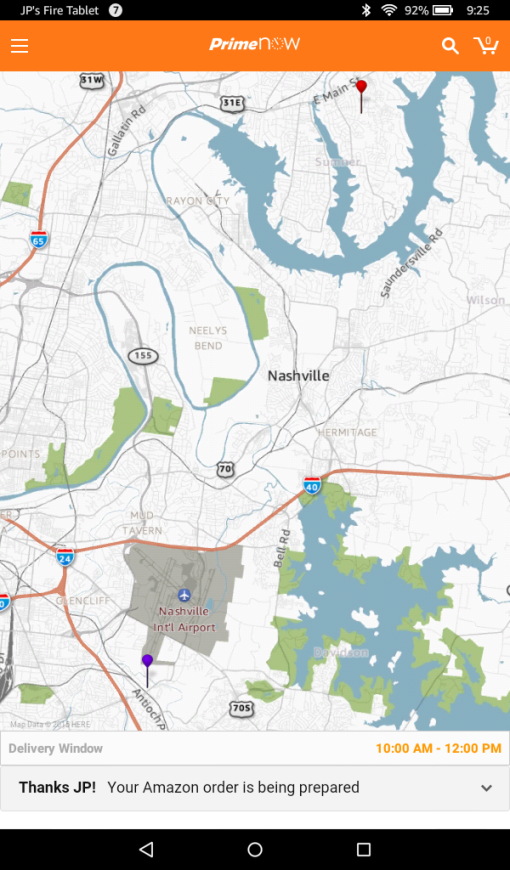
Screenshot_2015-11-28-09-25-04

Amazon PrimeNow

Using the mobile app it is possible to see the location of the delivery vehicle in real time on a map. This is handy, if the driver leaves early or late you’ll know roughly when to expect him/her. Or if they get stuck in traffic you’ll see that’s the case. I was able to see that the driver was delivering to other homes in our area 30 minutes before he came to ours.

Amazon prefer if you are at the delivery address when the delivery occurs. This is understandable with perishable items such as ice cream. It is possible to opt for items to be left without anyone being present.

1 Hour Delivery only available in select locations.

Screenshot 2015-11-28 at 10.29.43

Service availability is determined by Zip code.

My home is about a 30 minute drive from the Amazon PrimeNow warehouse.  As such Amazon do not offer 1 hour delivery for the extra fee of $7.99 in my zIp code. Not that I needed my items that quickly anyway. Don’t expect 1 hour delivery in all locations in the PrimeNow service area. It would be handy if they had a map showing the service area and delivery time windows available by zip code.

How Amazon select which zip codes are covered is also a mystery. My Daughters home which is about the same drive time from the warehouse is not covered. Maybe it’s based on the number of Prime Members in a zip code as well as distance/travel time. Transparency isn’t Amazon’s strong suit.

Did they turn up on time?

Yes, the items arrived during the 2 hour delivery window and less than 3 hours from time of purchase.

8:04am Order Placed and email acknowledgement received.

10:28am Text Received to say Geoffrey was close.

10:53am Driver arrived with order

10:54am Text received indicating delivery has been made.

Drivers use their own vehicles.

My driver arrived in a saloon car which appeared to be privately owned. I don’t know if drivers get paid for the miles they drive, my guess is not and that gas and wear and tear on their vehicle comes directly out of their own pockets. Amazon hire the drivers as independent contractors. All the more reason to be sure to give them a tip!!

Items packaged in a brown paper bag.

Small items are grouped and placed into a brown paper bag. Much less waste compared to the shipping boxes we have grown accustomed to with mail order. The bag has your address and the delivery time window prominently marked on a large label that is used to seal the paper bag.


Android Pay, Successes and Quirks

5 10 2015
APay

Android Pay

Since it’s launch several weeks ago I have successfully used Android Pay for transactions at two different merchants. The user experience changes depending on which merchant you use Android Pay at. Hopefully consistency will come to Android Pay as it matures.

OfficeDepotPayment 1 – Office Depot – Tap, PIN, Finished.

My first successful transaction at Office Depot went without a hitch. I held my phone to the payment terminal close to the tap and pay icon, it beeped within a second and I saw a green check mark indicating success. I was prompted to enter a PIN on the payment terminal, (similar to the process for a Debit Card). I entered my old Google Wallet PIN and the transaction completed quickly.

That was Easy.

StaplesPayment 2 – Staples – Tap, Sign, Ooops, Finished (eventually).

The second transaction at Staples took a little longer. I saw Apple Pay and Tap and Pay advertising taped onto the payment terminal but it wasn’t obvious where to hold the phone. Maybe the tap and pay icon was obscured by the advertising. I held the phone above the advertising and it beeped and I got a green check instantly.

Then the clerk informed me of the total price charged and I paused. The amount she quoted was three times the price of the item, I questioned the amount. Unlike a Credit Card swipe the payment terminal didn’t ask me if the total amount was OK. I asked the clerk how to cancel the transaction. “You can’t” was the response, “go ahead and sign and I’ll process a partial return”. There’s a difference, I was not asked for a PIN, but asked to sign instead. This seems much less secure.

That wasn't so easy

That wasn’t so easy

After the transaction completed the clerk took 2-3 minutes of several tries to process the partial return, eventually she asked to see my credit card again. I asked do I scan my phone again, I don’t have that credit card on me!?! “No” she said and pressed a button to complete the return. The clerk handed me both the original receipt with the overcharge and a separate receipt showing the credit amount.

That wasn’t so easy.

ChaseI’ll have to wait for the credit to show up

The charge shows up on my Chase credit card as a pending transaction, but the credit has yet to show. This is fairly typical, credits take longer. I’ll add an update to this post once enough time has gone by for the credit to appear.

Summary

To be fair the transaction at Staples took much longer because of the item ringing up at the wrong price. However the difference in the process is both odd and concerning. At Office Depot I entered a PIN to complete the transaction, at Staples I signed, just like a traditional card swipe. How does the check out clerk verify the signature is good if there is no physical card present? Seems very odd and less secure than a traditional credit card.

The lack of confirmation regarding the amount charged is also a concern. It seems to charge without confirming the price charged thereby requiring a credit to correct any errors at the checkout. Not having the physical card also caused extra delay for the clerk to process the credit.

PINEntryI preferred the process at Office Depot, the requesting of a PIN adds an extra layer of security which is superior to traditional credit cards that use a swipe. This new process is also more secure than Chip and Sign cards being introduced. I hope when all the glitches are worked out of Android Pay we end up with a PIN requirement. Tap and PIN is much more secure than Chip and Sign or Tap and Sign.

Credit Update October 6th 2015.

Android Pay Credits Work!!

Android Pay Credits Work!!

The Credit from Staples did get posted 24 hrs later through Android pay. It looks like Credits work just fine. I’ll keep my eye on my Chase account to see when the credit transaction shows up there. The original charge of $24.02 is still showing as a pending transaction.

Credit Update and Rewards Eligibility

I was glad to see the credit transaction posted to my credit card account with Chase. Not just because I got my partial refund, but I also noted that despite the Chase card not being ‘officially supported’ by Android Pay I still accrue the correct rewards points percentage on my credit card.

Android Pay is working just fine as far as I am concerned.

Credits and Rewards points work just fine with Android Pay.

Credits and Rewards points work just fine with Android Pay.


First attempt using Android Pay – FAIL!

20 09 2015
Android Pay Logo

Android Pay Logo

Google rolled out Android pay on a limited basis in the last few weeks, and nationwide for anyone this week.

I thought I would give it a try. I was in Office Depot which is listed as a Android Pay merchant and there were no other customers. Ideal time to try this new fangled payment method. I had already added my Chase VISA card to Android Pay and all looked good and ready.

I noticed the Tap and Pay icon on the Credit Card Reader. I asked at the checkout if they accepted cell phone payments. “Yes we accept Apple Pay” was the response. Good enough I thought, they’ve probably never heard of Android Pay so I proceeded without asking further questions.

Tap and Pay Icon found on checkout card readers

Tap and Pay Icon found on checkout card readers

I unlocked my phone, held it next to the tap and pay icon and beep, it did something. For some reason it didn’t work, the checkout clerk muttered something and said try again. I tried again, this time it looked good and showed a large a green check in place of the android pay logo on phone. Apparent success, I asked the checkout clerk if it went through.

Then I noticed a prompt on the merchant terminal for a PIN number. Hmmmm. I wasn’t expecting that. I entered my Google Wallet PIN as I could think of no other valid pin. The clerk said my transaction was declined.

Another customer walked up so I decided to pay with plastic and left the store.

So what went wrong?

Declined Tap and Pay Transaction. Click to Enlarge

Declined Tap and Pay Transaction. Click to Enlarge

I visited the Google Wallet webpage and there was was my declined transaction. ‘Please try again’ it said.

Chase Fraud Alert. Click to enlarge

Chase Fraud Alert

Then I noticed a fraud alert email from Chase Bank. They asked me if I was familiar with a suspicious transaction at Google/Office Depot. I clicked on Yes so my card wouldn’t be shutdown.

So it seems Android Pay worked between the merchant and Android Pay on my phone, but the bank (Chase) decided to decline the transaction.

Call to Chase Bank.

I spoke with the fraud Department at Chase. They did the usual identity verification and established the transaction was legitimate and I still had physical possession of the Credit Card. They did not share with me any reason for the transaction being declined, only that they wanted to check with me first. Chase did apologise for the inconvenience of having my charge declined.

The rep assured me that any further transactions with this merchant would be approved. I suppose I’ll find out next time I try and use Android Pay with my Chase card. I was glad they cleared the fraud flag, the odd thing however is this same Chase card has been used for years to top off my Google Wallet when buying apps at the Google Play Store. Maybe because it was a NFC transaction?

I appreciate that merchants and banks will be cautious with a new service like Android Pay. But decline a small $21 transaction? Seems a little over zealous to me. This is the first time Chase have ever declined a transaction. In the past they have even approved transactions while I was unknowingly over my credit limit.


What to do if your Moto X (2013) battery life suffers after upgrading to Lollipop 5.1

19 09 2015
Moto X Battery Life 2 1/2 Hours!! Click to enlarge

Moto X Battery Life 2 1/2 Hours!!
Click to enlarge

Verizon Wireless has finally rolled out Lollipop 5.1 android operating system to the Gen 1 2013 Moto X phones. The upgrade went without a hitch but I noticed my battery life was only 2 1/2 hours with very light use. I left the phone plugged in overnight but the next morning the problem was still present. The phone was noticeably hot to the touch as well. Something was keeping the phone’s CPU very busy.

After asking on Google+ if anyone else had seen this problem, many had. I received various pieces of advice ranging from ‘do nothing it will fix itself’, to ‘you’ll need to do a factory reset’.

The best advice I received was to clear the cache partition.

Not knowing how to do this I did some research, performed the operation and now I have a much better phone as a result. I now get 9-10 hours battery life with normal use. If you are having similar issues, here is how to do the same for your Moto X phone to restore the phone to normal operation. (The operation is non-destructive you do not lose any data, applications, call logs. It’s one of the safest remedies you can perform).

Clearing Your Cache Partition

Full instructions can be found at this website.

I suggest you visit the site, the author did a really nice job showing screen shots etc of how to do the cache clear operation. Just incase the website disappears one day here is a quick checklist of the steps one needs to perform.

Step 1:  Power off your phone.

Step 2. Access boot options

Press and hold the volume down button for 4-5 seconds first.  Do not release your finger from the volume down button!

While still pressing and holding the volume down button, now press and hold the power button for 4-5 seconds (you are pressing and holding two buttons now).

Then release your fingers from both the power and volume  buttons.

Step 3: Boot into recovery mode

In boot options page (as shown above), you have to:

use volume down button to navigate;

use volume up button to select, NOT the power button as you may assume.

Do not use power button in boot options page. It will reboot the phone.

Now use volume down button to move the cursor to Recovery, then press volume up button to make the selection.

The phone should now boot into recovery mode.

Step 4: Access recovery mode menu – (this can be tricky, the time you have the power button pressed is critical)

Once you get the dead Android, you must:

  1. press and hold power button for about 2-3 seconds. Don’t hold this for to long!!
  2. without releasing power button, press volume up button and quickly release the volume up button.
  3. quickly release the power button button.

If the phone reboots, it means you hold the power button too long. 

Step 5: Clear cache partition

In recovery mode menu, use volume down or volume up  button to navigate to “Wipe cache partition” .

Then use the Power button to select it. This is different from step 3.

After selecting the wipe cache partition, your phone will start to wipe all cache files in the cache partition. This operation can take 5 minutes or more so be patient. WHen it is complete it will return to the recovery mode menu.

Step 6: Reboot the phone

You can select Reboot system now from the recovery mode menu.


Installing Google Chrome on Knoppix 7.4 Persistant

9 11 2014

Knoppix 7.4 comes with the IceWeasel browser. Awesome name, but I really prefer Google Chrome.If you have a persistent version of Knoppix on a thumb drive or hard drive then there are few steps you have to go through to install Google Chrome.

1. Download 32-bit Debian version of Google Chrome. Just go to google.com in IceWeasel and search for chrome browser. The download will be saved in the downloads folder automatically.

2. Install Google Chrome

Open a terminal window using the tool bar.

Type CD Downloads. (Yes capitalization is important).

Type SUDO DPKG -i <Package name>

where <package name. = the name of the downloaded file.

at the time of writing the command is

SUDO DPKG -i google-chrome-stable_current_i386.deb

During the install you will see an error about libappindicator1 not being installed.

3. Fix dependencies using Synaptic Package Manager

In your terminal window type

SUDO synaptic

Ignore prompt to fix broken packages.

Click on the search button and type

libappindicator1 and press enter

Right click the application package libappindicator1 and mark for installation.

Click apply changes.

Done!!

Google Chrome will now be in your “Internet” Menu. Login with your gmail credentials and all extensions will automatically install. If you use hangouts, it will install a hangouts application and place it in the system tray.